วันจันทร์ที่ 20 ธันวาคม พ.ศ. 2564

หมูผัดพริกหยวก มะระผัดไข่ ผัดบวบใส่ไข่ หมูผัดพริกเกลือ


ส่วนผสมและสัดส่วน
1. พริกหยวกหั่นแฉลบหรือหั่นแว่น 4 – 5 เม็ด
2. หอมใหญ่หั่นแว่น ½ หัว
3. กระเทียมสับ ¼ ช้อนโต๊ะ
4. เนื้อหมูหั่นชิ้น 1 ถ้วย
เครื่องปรุง

1. น้ำตาลทราย 1 ช้อนชา
2. ซีอิ๊วขาว 1 ½ ช้อนโต๊ะ
3. ซอสปรุงรส 1 ช้อนชา
4. น้ำมันหอย 1 ช้อนโต๊ะ


 มะระผัดไข่

 ซอสหอย 3ชต
ซีอิ๊วขาว 1 ชต.
น้ำตาล ครึ่ง ชช.


ผัดบวบใส่ไข่

- บวบเหลี่ยม  2 ลูก
- ไข่ไก่ 2 ฟอง  
- กระเทียมสับ 1 ชต.
- ซีอิ๊วขาว  1 ชต.
- ซอสหอยนางรม 1/2 ชต.
- น้ำตาลทราย  1/2 ชต.
- น้ำมันสำหรับผัด 2 ชต.
- น้ำเปล่า  2  ชต.


หมูผัดพริกเกลือ

น้ำมันหอย 1 ชต

เกลือ 1 ชช

น้ำตาลทราย 1 ชช.

วันจันทร์ที่ 13 ธันวาคม พ.ศ. 2564

ตำปลาร้า

 เจ๊1

พริกป่น 3 ช้อนโต๊ะ

ปลาร้า 1 กระบวย

น้ำปลา 3 เหยาะ

น้ำตาลเคี่ยว 1 กระบวย + 3 เหยาะ

น้ำมะนาว 1 กระบวย

------------------------


เจ๊ toktak

พริกแห้ง 

น้ำตาลทราย 1 ช้อนโต๊ะ

ผงชูรส 1 ช้อนโต๊ะ

ตำให้เข้ากัน

น้ำตาลปี๊บ 1 1/2 ช้อนโต๊ะ

น้ำปลาร้า 2 1/2 ทัพพี

ตำให้เข้ากัน

น้ำมะนาว 1 1/2 ทัพพี

ไม่ตำมะนาว ใส่เอากลิ่น

‐-----------------------

คิดเอง

ผงชูรส ครึ่งชต.
น้ำตาลปี๊ป ครึ่งชต.พูน
น้ำมะขามเปียก เกือบเต็มช้อนแต่ไม่เต็ม
น้ำปลาร้า 1 ชต.พูน
น้ำปลา 3 หยด
พริกแดง1เม็ดพริกแห้ง2เม็ด
มะเขือเทศใหญ่ เกือบ1ลูกพอให้น้ำขลุกขลิก

วันเสาร์ที่ 27 พฤศจิกายน พ.ศ. 2564

ผัดผักบุ้งไฟแดง

เต้าเจี้ยว 1 ช้อน
น้ำมันหอย 2 ช้อน
ซีอิ๊วขาว 1/2 ช้อน
น้ำตาลทราย 1 ชช.
น้ำ 3 ช้อน

ราดพริกกระเทียมบนผักเลย

วันจันทร์ที่ 27 กันยายน พ.ศ. 2564

ซูกินีทอด

 ไข่ไก่        3ฟอง
แป้งข้าวเจ้า   1ชต.
ผงฟู    1ชช.
แป้งสาลี   250กรัม
ผมปรุงรส 1ชช.
แป้งทอดกรอบ 10ชต.
เกลือ 0.5 ชต.
น้ำปูนใส 1:1 น้ำเปล่าเย็นจัด    0.6 ลิตร

วันพุธที่ 1 กันยายน พ.ศ. 2564

วันจันทร์ที่ 14 มิถุนายน พ.ศ. 2564

บลูเบอรี่ชีสพาย


ส่วนผสม บลูเบอรี่ชีสพาย

  • แครกเกอร์ 3 แถว (แถวละ 100 กรัม)
  • เนยสดชนืดเค็ม 1/2 ก้อน (ก้อนละ 227 กรัม)
  • ครีมชีส 1 ก้อน (250 กรัม)
  • โยเกิร์ตรสธรรมชาติ 1 ถ้วย
  • นมข้นหวาน 2 ช้อนแกง
  • น้ำมะนาว 1 ช้อนแกง
  • บลูเบอรี่ 1 กระป๋อง (กระป๋องละ 595 กรัม)
  • ถ้วยฟอยด์เบอร์ 3202-P (1 แพ็ค 20 ชิ้น)

วันพุธที่ 19 พฤษภาคม พ.ศ. 2564


Renaming the headings in the navigation pane without changing the "real headings" in the content


Assuming that you also want just "Part A" in your TOC, you can accomplish this with a style separator.

  1. Create a style with formatting identical to your heading style but with outline level of Body Text.
  2. Using the heading style, type "Part A" and press Enter.
  3. Apply the non-heading style and type " [1234]."
  4. Place the insertion point anywhere in the heading paragraph and press Alt+Ctrl+Enter to insert the style separator.
  5. The two paragraphs will appear to join, but only the heading text will appear in the Navigation pane and TOC.

วันเสาร์ที่ 1 พฤษภาคม พ.ศ. 2564

ผัดผักบุ้งไฟแดง

1. ตำพริกกระเทียม พอหยาบ 3 ช้อนโต๊ะ (ใช้พริกขึ้หนูแดง)
2. น้ำมันหอย  2  ช้อนโต๊ะ
3. เต้าเจี้ยว 1 ช้อนโต๊ะ
4. น้ำตาลทราย 1 ช้อนชา
5. ซอสปรุงรสฝาเขียว 1 ช้อนชา (ไม่ใส่เยอะความเค็มจากเต้าเจี้ยวและน้ำมันหอย พอแล้ว)
นำผักบุ้งล้างน้ำ สะบัดให้สะเด็ดน้ำ
เด็ดผักบุ้ง ใส่กระชอนเขย่าให้น้ำออก

นำกระทะตั้งไฟ เปิดไฟเร่งรอกระทะร้อน
ระหว่างรอ นำเครื่องปรุง 1 - 4 (ยกเว้นซอสฝาเขียว) วางลงบนผักบุ้งที่เด็ดไว้
น้ำมันในกระทะมีควันขึ้นแสดงว่าร้อนแล้ว
เทผักบุ้งลงไปเลย โดยให้เครื่องปรุงลงไปก่อน
จากนั้นรีบเหยาะซอสฝาเขียวลงไป
จากนั้นผัดให้เข้ากัน ไม่ต้องผัดจนผักสุกมากนะ
ตักใส่จาน โรยพริกไทยป่น (สักฟักผักบุ้งจะสุกทั่วกัน ไม่เหนียว / ดำ เกินไป )

ปล. ระวังอย่าให้มีน้ำในกระชอนอยู่เยอะเกิน ผัดผักบุ้งก็จะไม่มีน้ำเจิ่งละค่ะ

วันเสาร์ที่ 3 เมษายน พ.ศ. 2564

 จัดกึ่งกลาง

1. คลิกเลเยอร์ตัวอักษร

2. Ctrl+คลิกเลเยอร์โปสเตอร์

3.กดปุ่ม aligh center

วันเสาร์ที่ 20 มีนาคม พ.ศ. 2564


How to fix edges in Photoshop for perfect cutouts


Removing edge fringes and halos from Photoshop Cutouts.

In this Photoshop tutorial, I’ll show you how to fix edges to make them perfect. Often when cutting out images you are left with dark or light edges. These are called halos or fringes. They are easily removed and I’ll show you exactly how I like to do it. These are other options such as using the matting tools in Photoshop to fix the edges, but I prefer this method for photos of people, because I don’t want to treat the hair the same as the skin areas. If you do that, you will risk creating “helmet hair”. To fix the hair, I like to use the refine brush in Select and mask and can be found in my extracting tutorials. More tutorials listed at the bottom.

Speaking of other tutorials, feel free to use the search bar at the top of PhotoshopCAFE (It works really well) and you will discover tons of other useful tutorials, just like this one.

Check out the video to see the steps and then read the written instruction for clarity and reference. (bookmark and share this page)


Let’s begin 
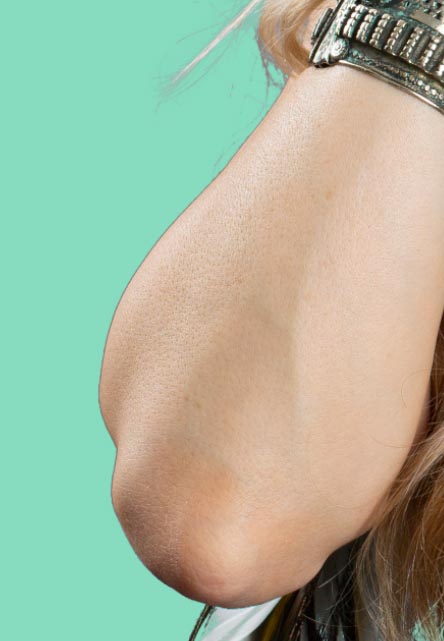
with a photo I recently shot, while preparing images for my Lightroom Classic training course here at the CAFE.  (Thanks Callan, for modeling 
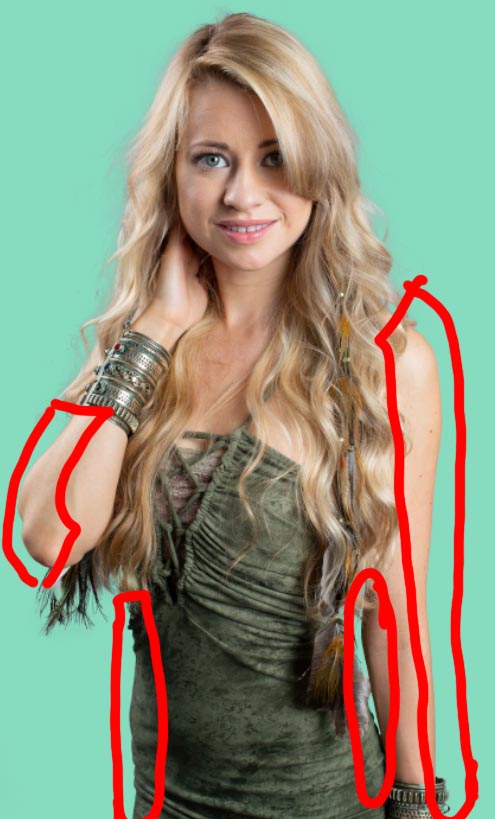
for me). Here is a photograph I have cut out and you will notice the dark edges around the skin. (I placed it on this bright background to make it easy for you to see the edges).
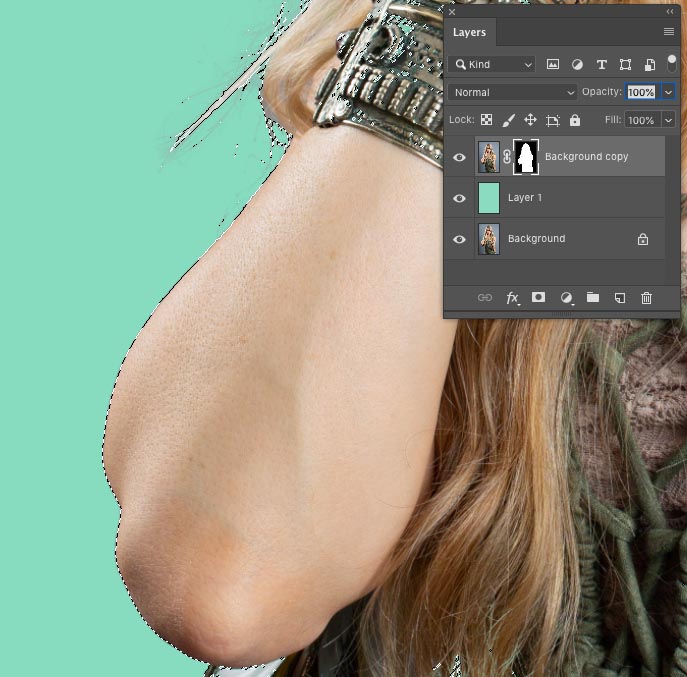
Zooming in for a close look, You can see the edges are very obvious and need some work. (Don’t worry about the hair, the focus on this tutorial is the hard edges).

Step 1 // Load the selection.

Hold down Ctrl/Cmd and click on the layer was thumbnail (Ctrl+click the layer instead if you didn’t use a mask)

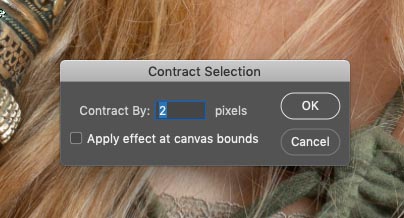
Step 2 // Contract the selection.

Choose Select>Modify>Contract and enter a setting of 2 pixels
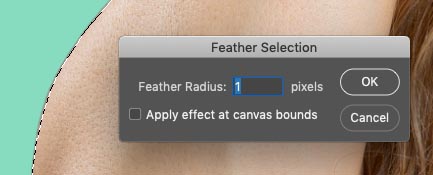
Step 3 //

Choose Select>Modify>Feather. Set it to one pixel.

Step 4 //

Right now we need to swap the selection, so that the outside is selected and just the 2 pixels of the outside edge.

Press Ctrl/Cmd+Shift+I or select>inverse from the menu

Step 5 // brush away the edge halo

Choose a brush and set the color to black and the opacity to 100

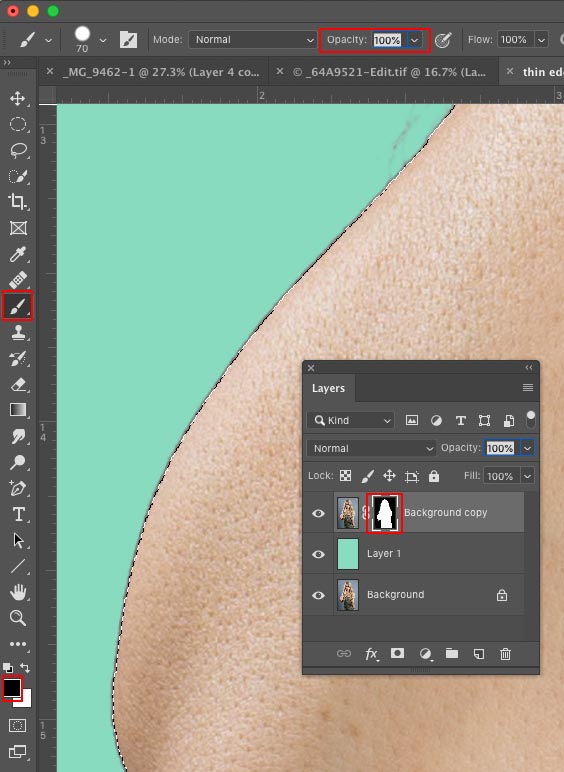
Step 6.  //Paint the edges
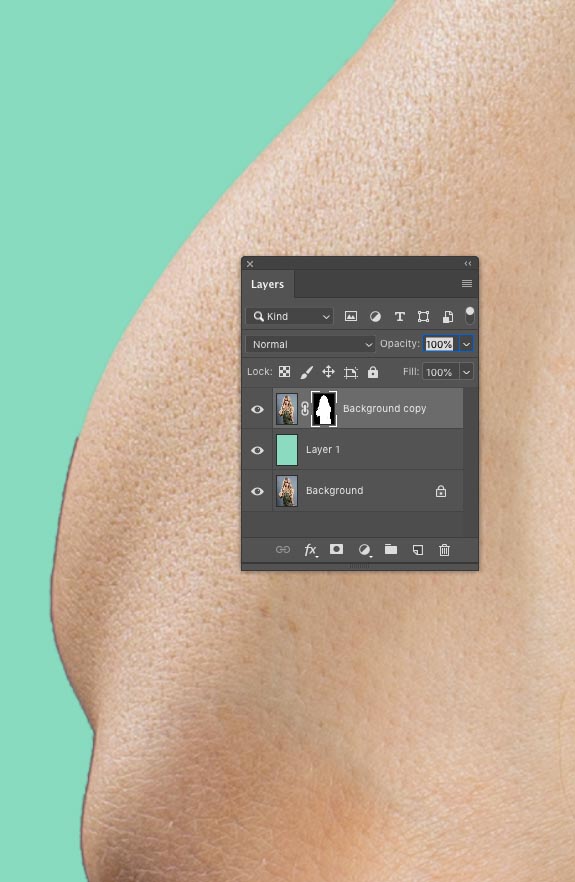
With the layer Mask selected Paint on the edges and you will see the fringe disappear and a nice smooth edge as you paint. Sometimes, you may need to paint over the edge 2x if you aren’t getting the desired result in the first pass. The feather allows for 2 passes.

I pressed Ctrl/Cmd+H to hide the selection so I can see better while repairing the edge.
(If you extracted on the layer instead of using a mask, use the eraser tool instead).

Conclusion

To finish up the piece, I painted around all the indicated edges.

Photoshop CC Selection Secrets

New Course by Colin Smith

Stop struggling with selections. Learn how to select and cut out anything from people, hair, trees, complex shapes and even transparency.
Discover how to get perfect edges, without halos and jaggies. Colin shows you exactly how in 18 lessons.
All the images are included for you to follow along.
You will be able to select and cut out anything: faster and cleaner. 

selections and masks in Photoshop CC

More info here

Here are some of my other tutorials on extracting things from backgrounds in Photoshop

List of some of the Photoshop cutout tutorials here at PhotoshopCAFE. Most contain both video and detailed written steps.

Thanks for checking out this tutorial. Come back for now tutorials every week.

Don’t forget to join our list for more free tutorials and Photoshop tips. 

Great to see you here at the CAFE.

Colin


blend mode ebook

Layer Blending Modes. Free eBook by Colin Smith

Grab your free PDF ebook right now. We were going to sell this for $9.99, but figured we would give it away instead and see what happens 🙂

blend


ตัดขอบแบบเซียน


Hi

1. Put a new empty layer directly above the masked image layer.

2. Set the blending mode of that empty layer to color

3. Alt click on the border between the empty layer and masked layer in the layers panel. A small down arrow will appear to indicate the new layer is clipped to the masked layer below

4. Take a soft brush and click with the Alt key to pick up colour from the head. Brush over the edge - onto the new empty layer. The green colour will change to the head colour. The clipping mask will prevent you painting over the edge. Work round the edges - alt clicking to change colour where needed.

Dave

วันเสาร์ที่ 6 กุมภาพันธ์ พ.ศ. 2564

ผัดยอดมะระหวาน

 วัตถุดิบ

1. ยอดฟักแม้ว หรือยอดมะระหวาน 1 กำ

2. กระเทียม 2 กลีบ

3. พริกขี้หนู 4 เม็ด

4. น้ำมันหอย 1 ช้อนโต๊ะ

5. ซีอิ้วขาว 2 ช้อนชา

6. น้ำปลา 2 ช้อนชา

7. น้ำตาล 1 ช้อนชา

ย้อมผม

ผมสั้นไม่เกินบ่า > 3 กล่องขึ้นไป